
Los robots de limpieza Roomba de iRobot fueron una auténtica revolución. Hoy podemos encontrar en el mercado muchísimos competidores de infinidad de marcas (como la china Xiaomi, la española Cecotec y su Conga etc.) que incorporan un sinfín de funcionalidades y a un precio bastante razonable. Pero la empresa que abrió la senda de la robótica doméstica fue sin duda la americana iRobot.
La Roomba de iRobot venía a ayudarnos en las labores de limpieza del hogar, permitiéndonos aspirar la casa de manera desatendida, y eso ya era un gran motivo para hacernos con una. Pero no sólo eso, era un ROBOT con mayúsculas. Por lo que los que es un must para los que nos consideramos makers.
Las primeras versiones de Roomba eran bastante sencillas si las comparamos con las actuales. No tenían conexión a internet, creación de mapas, rutas programadas etc. Limpiaban… y ya está.
Pero la gente de iRobot sabía que se le podía sacar mucho más partido y ofreció a los usuario la posibilidad de hackear la Roomba e introducir modificaciones a su gusto. ¿Cómo? A través del ROI.
ROI: Roomba Open Interface
Así es. La mayoría de la gente desconoce esta característica, pero los robots Roomba disponen de un conector de 8 pines que no es otra cosa que un puerto serie.
iRobot ha publicado además el protocolo de comunicación para interactuar con Roomba, con lo que no es difícil modificar el comportamiento de Roomba a nuestro gusto e introducirle todas las funcionalidades que se nos ocurran. Os lo dejo por aquí:
En este artículo te mostraré un caso de uso muy muy sencillo, ya que conectaré un módulo bluetooth (el BlueSMIRF Gold que te enseñé en https://jjosemayorga.com/comunicacion-bluetooth/) directamente al conector ROI y mandaré los mensajes a través de una aplicación Android.
Podríamos hacer uso también de cualquier microcontrolador: Arduino, Raspberry Pi,, NodeMCU… que incorpore comunicación serie.
El conector ROI (Roomba Open Interface)
Lo primero que tenemos que hacer es conectar correctamente el módulo bluetooth empleado. Para eso necesitamos conocer la finalidad de cada pin del conector ROI. Podéis encontrar el esquema en la página 3 del manual.
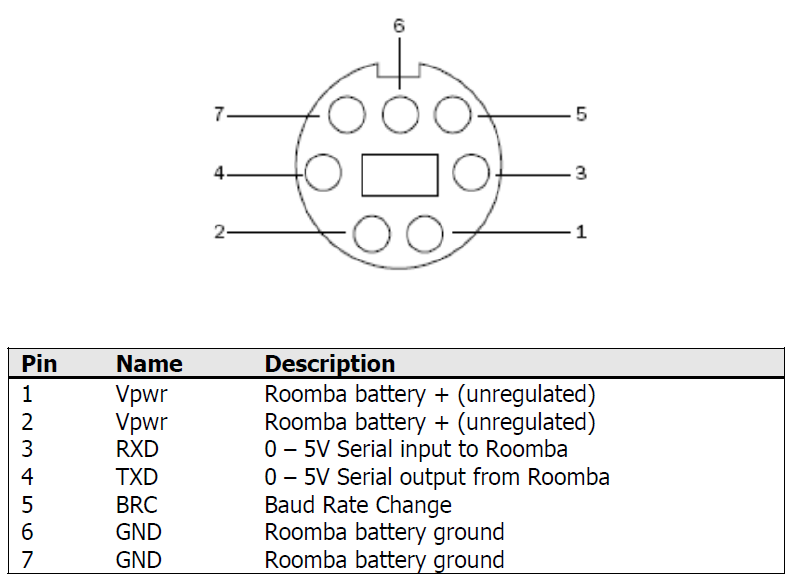
Vemos que la Roomba ofrece dos pines de Vcc y dos de tierra. y que la tensión no está regulada. Esto se debe a que depende de la carga de la batería. He medido la tensión con un polímetro y el valor es de unos 16V. Esta tensión es excesiva para el módulo que voy a emplear o cualquier otro microcontrolador cuya tensión de alimentación típica es de 5V. En el apartado Componentes veremos cómo resolver esta cuestión.
Además de los pines de alimentación, tenemos los pines Rx/Tx para la comunicación serie. Como siempre que hacemos una conexión serie, tendremos que unir el Rx del BlueSMIRF Gold con el Tx de Roomba y el Tx del BlueSMIRF Gold con el Rx de Roomba .
Componentes
Para establecer conexión con la Roomba he utilizado los siguientes materiales:
- 1 x Módulo bluetooth HC-06.
- 1 x Cable conector mini DIN de 7 pines. Para disponer de un hilo procedente de cada pin.
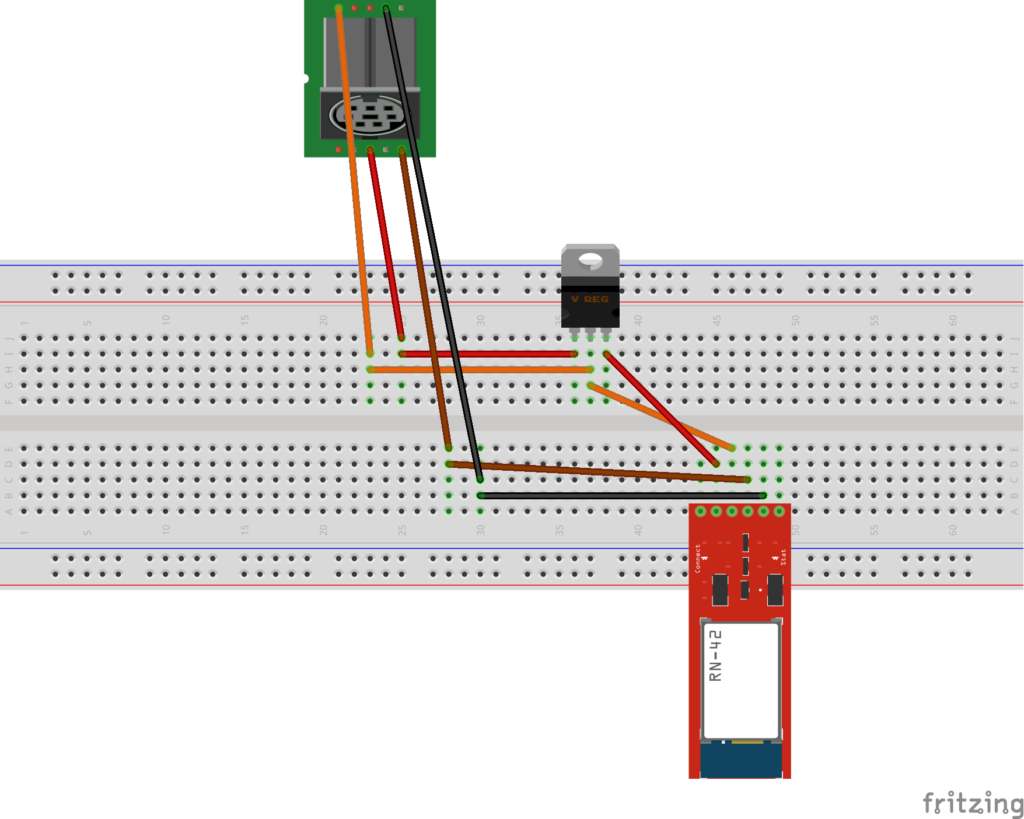
- 1 x Regulador de tensión LM7805. Para garantizar que el módulo bluetooth se alimenta con 5V interpondremos este elemento entre los pines de la Roomba y los del módulo.
- 1 x Protoboard.
Es importante que antes de hacer la conexión efectiva de los elementos, «timbremos» el cable mini DIN, esto es, que verifiquemos qué hilo corresponde a cada pin midiendo la continuidad con un multímetro.
En el caso del cable que os he enlazado las correspondencias serían:
- Pin 1: cable morado vivo – Vcc.
- Pin 2: cable rojo – Vcc.
- Pin 3: cable morado mustio – Rx.
- Pin 4: cable negro fino – Tx.
- Pin 5: cable verde – Baud Rate change.
- Pin 6: cable amarillo – Gnd.
- Pin 7: cable naranja – Gnd.
Conectamos estos elementos según el siguiente esquema:
Aplicación Android
Vamos a diseñar una aplicación Android que nos permita conectar con el módulo bluetooth y enviar a través de él diferentes mensajes para realizar las acciones que deseemos..
La conexión con el módulo bluetooth se realiza de la misma manera que en https://jjosemayorga.com/aplicacion-android-con-funcionalidad-bluetooth/ y pondremos varios botones que nos permitirán arrancar la Roomba, detenerla y, lo más innovador, reproducir una canción, que en este caso será el himno del Atlético de Madrid.
Para saber qué mensaje debemos transmitir en cada caso basta con acudir a la especificación que os dejé arriba.
Así, por ejemplo, para reproducir el himno del Atlético de Madrid, primero tendremos que almacenarlo en la posición 1 del listado de canciones tal como se dice en la página.19 (Opcode: 140) y a continuación reproducirla (página 20: Opcode:141).
Código de la interfaz gráfica
<?xml version="1.0" encoding="utf-8"?>
<RelativeLayout xmlns:android="http://schemas.android.com/apk/res/android"
    xmlns:tools="http://schemas.android.com/tools"
    android:id="@+id/activity_pantallatest"
    android:layout_width="match_parent"
    android:layout_height="match_parent"
    android:paddingBottom="@dimen/activity_vertical_margin"
    android:paddingLeft="@dimen/activity_horizontal_margin"
    android:paddingRight="@dimen/activity_horizontal_margin"
    android:paddingTop="@dimen/activity_vertical_margin"
    tools:context="juanjo.roombatest.pantallatest">

    <LinearLayout
        android:orientation="vertical"
        android:layout_width="match_parent"
        android:layout_height="match_parent">

        <Switch
            android:text="Bluetooth "
            android:layout_width="wrap_content"
            android:layout_height="0dp"
            android:id="@+id/swt_bluetooth"
            android:layout_weight="1"
            android:layout_gravity="center_vertical|center_horizontal"
            android:paddingRight="10dp"
            android:layout_alignParentTop="true"
            android:layout_centerHorizontal="true" />

        <Switch
            android:text="Conectar "
            android:layout_width="wrap_content"
            android:layout_height="0dp"
            android:id="@+id/swt_conectar"
            android:layout_weight="1"
            android:layout_gravity="center_vertical|center_horizontal"
            android:paddingLeft="10dp"
            android:layout_below="@+id/swt_bluetooth"
            android:layout_alignLeft="@+id/swt_bluetooth"
            android:layout_alignStart="@+id/swt_bluetooth" />

        <Button
            android:text="CLEAN"
            android:layout_width="match_parent"
            android:layout_height="0dp"
            android:id="@+id/btn_clean"
            android:layout_weight="1" />

        <Button
            android:text="STOP"
            android:layout_width="match_parent"
            android:layout_height="0dp"
            android:id="@+id/btn_stop"
            android:layout_weight="1" />

        <Button
            android:text="BRUSH"
            android:layout_width="match_parent"
            android:layout_height="0dp"
            android:id="@+id/btn_brush"
            android:layout_weight="1" />

        <LinearLayout
            android:orientation="horizontal"
            android:layout_width="match_parent"
            android:layout_height="0dp"
            android:layout_alignParentTop="true"
            android:layout_centerHorizontal="true"
            android:layout_weight="1">

            <Button
                android:text="SONG"
                android:layout_width="wrap_content"
                android:layout_height="match_parent"
                android:id="@+id/btn_song"
                android:layout_weight="1" />

            <Button
                android:text="PLAY"
                android:layout_width="wrap_content"
                android:layout_height="match_parent"
                android:id="@+id/btn_play"
                android:layout_weight="1" />
        </LinearLayout>
    </LinearLayout>

</RelativeLayout>
Código de la actividad
package juanjo.roombatest;

import android.bluetooth.BluetoothAdapter;
import android.bluetooth.BluetoothDevice;
import android.bluetooth.BluetoothSocket;
import android.content.Intent;
import android.os.Build;
import android.support.v7.app.AppCompatActivity;
import android.os.Bundle;
import android.util.Log;
import android.view.View;
import android.widget.Button;
import android.widget.ImageButton;
import android.widget.Switch;
import android.widget.Toast;

import java.io.IOException;
import java.io.OutputStream;
import java.lang.reflect.Method;
import java.util.UUID;

public class pantallatest extends AppCompatActivity
{
    // these should all be bytes, but Java bytes are signed, sucka
    public static final int START   =  128;  // 0
    public static final int BAUD    =  129;  // 1
    public static final int CONTROL =  130;  // 0
    public static final int SAFE    =  131;  // 0
    public static final int FULL    =  132;  // 0
    public static final int POWER   =  133;  // 0
    public static final int SPOT    =  134;  // 0
    public static final int CLEAN   =  135;  // 0
    public static final int MAX     =  136;  // 0
    public static final int DRIVE   =  137;  // 4
    public static final int MOTORS  =  138;  // 1
    public static final int LEDS    =  139;  // 3
    public static final int SONG    =  140;  // 2N+2
    public static final int PLAY    =  141;  // 1
    public static final int SENSORS =  142;  // 1
    public static final int DOCK    =  143;  // 0
    public static final int PWMMOTORS = 144; // 3
    public static final int DRIVEWHEELS = 145; 	// 4
    public static final int DRIVEPWM = 146;  // 4
    public static final int STREAM  =  148;  // N+1
    public static final int QUERYLIST = 149; // N+1
    public static final int STOPSTARTSTREAM = 150;  // 1
    public static final int SCHEDULINGLEDS = 162; 	// 2
    public static final int DIGITLEDSRAW = 163; 	// 4
    public static final int DIGITLEDSASCII = 164;	// 4
    public static final int BUTTONSCMD  =  165; // 1
    public static final int SCHEDULE =  167;  // n
    public static final int SETDAYTIME = 168; // 3


    private static final String TAG = "bluetooth";

    Button btn_clean, btn_stop, btn_brush, btn_song, btn_play;
    Switch swt_bluetooth, swt_conectar;

    int lighton=0;
    int conectado=0;

    private BluetoothAdapter btAdapter = null;
    private BluetoothSocket btSocket = null;
    private OutputStream outStream = null;

    // SPP UUID service
    private static final UUID MY_UUID = UUID.fromString("00001101-0000-1000-8000-00805F9B34FB");

    // MAC-address of Bluetooth module (you must edit this line)
    //private static String address = "00:14:03:06:2D:F4"; //para el modulo HC-06
    private static String address = "00:06:66:4B:E4:25"; //para el modem blueSmirf
    //private static String address = "98:D3:31:90:8E:68"; //para el modulo HC-05


    @Override
    protected void onCreate(Bundle savedInstanceState) {
        super.onCreate(savedInstanceState);
        setContentView(R.layout.activity_pantallatest);

        swt_bluetooth = (Switch) findViewById(R.id.swt_bluetooth);
        swt_conectar = (Switch) findViewById(R.id.swt_conectar);
        btn_clean = (Button) findViewById(R.id.btn_clean);
        btn_stop = (Button) findViewById(R.id.btn_stop);
        btn_brush = (Button) findViewById(R.id.btn_brush);
        btn_song = (Button) findViewById(R.id.btn_song);
        btn_play = (Button) findViewById(R.id.btn_play);

        btAdapter = BluetoothAdapter.getDefaultAdapter();

        swt_bluetooth.setOnClickListener(new View.OnClickListener() {
            @Override
            public void onClick(View v) {
                //is chkIos checked?
                if (swt_bluetooth.isChecked()) {
                    checkBTState();
                } else {
                    if (conectado == 1) {
                        swt_conectar.setChecked(false);
                        desconectarRobot();
                    }
                    btAdapter.disable();
                }
            }
        });

        swt_conectar.setOnClickListener(new View.OnClickListener() {
            @Override
            public void onClick(View v) {
                //is chkIos checked?
                if (swt_conectar.isChecked()) {
                    conectarRobot();
                } else {
                    desconectarRobot();
                }
            }
        });

        btn_clean.setOnClickListener(new View.OnClickListener()
        {
            @Override
            public void onClick(View v)
            {
                byte cmd[] = { (byte)START, (byte)CONTROL, (byte)CLEAN};
                sendData(cmd);
            }
        });

        btn_song.setOnClickListener(new View.OnClickListener()
        {
            @Override
            public void onClick(View v)
            {
                byte cmd[] = {(byte)SONG, 1, 16, 74, 8, 74, 64, 71, 32, 30, 24, 71, 8, 71, 64, 67, 32, 30, 24, 71, 8, 71, 32, 67, 24, 69, 8, 71, 32, 72, 32, 69, 96, 30, 24};
                sendData(cmd);
            }
        });

        btn_play.setOnClickListener(new View.OnClickListener()
        {
            @Override
            public void onClick(View v)
            {
                byte cmd[] = {(byte)PLAY, 1};
                sendData(cmd);
            }
        });

        btn_stop.setOnClickListener(new View.OnClickListener()
        {
            @Override
            public void onClick(View v)
            {
                byte cmd[] = {(byte)SONG, 1, 1, 69, 64, (byte)PLAY, 1};
                sendData(cmd);
            }
        });

        btn_brush.setOnClickListener(new View.OnClickListener()
        {
            @Override
            public void onClick(View v)
            {
                byte cmd[] = {(byte)START, (byte)CONTROL, (byte)LEDS, (byte)0, (byte)255, (byte)128};
                sendData(cmd);
            }
        });
    }

    private BluetoothSocket createBluetoothSocket(BluetoothDevice device) throws IOException
    {
        if(Build.VERSION.SDK_INT >= 10){
            try {
                final Method m = device.getClass().getMethod("createInsecureRfcommSocketToServiceRecord", new Class[] { UUID.class });
                return (BluetoothSocket) m.invoke(device, MY_UUID);
            } catch (Exception e) {
                Log.e(TAG, "Could not create Insecure RFComm Connection",e);
            }
        }
        return device.createRfcommSocketToServiceRecord(MY_UUID);
    }

    public void conectarRobot()
    {
        super.onResume();
        Log.d(TAG, "...onResume - try connect...");

        // Set up a pointer to the remote node using it's address.
        BluetoothDevice device = btAdapter.getRemoteDevice(address);

        // Two things are needed to make a connection:
        //   A MAC address, which we got above.
        //   A Service ID or UUID.  In this case we are using the
        //     UUID for SPP.

        try {
            btSocket = createBluetoothSocket(device);
        } catch (IOException e1) {
            errorExit("Fatal Error", "In onResume() and socket create failed: " + e1.getMessage() + ".");
        }

        /*try {
          btSocket = device.createRfcommSocketToServiceRecord(MY_UUID);
        } catch (IOException e) {
          errorExit("Fatal Error", "In onResume() and socket create failed: " + e.getMessage() + ".");
        }*/

        // Discovery is resource intensive.  Make sure it isn't going on
        // when you attempt to connect and pass your message.
        btAdapter.cancelDiscovery();

        // Establish the connection.  This will block until it connects.
        Log.d(TAG, "...Connecting...");
        try {
            btSocket.connect();
            Log.d(TAG, "...Connection ok...");
            conectado=1;
        } catch (IOException e) {
            try {
                btSocket.close();
            } catch (IOException e2) {
                errorExit("Fatal Error", "In onResume() and unable to close socket during connection failure" + e2.getMessage() + ".");
            }
        }

        // Create a data stream so we can talk to server.
        Log.d(TAG, "...Create Socket...");

        try {
            outStream = btSocket.getOutputStream();
        } catch (IOException e) {
            errorExit("Fatal Error", "In onResume() and output stream creation failed:" + e.getMessage() + ".");
        }
    }


    public void desconectarRobot()
    {
        Log.d(TAG, "...In onPause()...");

        if (outStream != null) {
            try {
                outStream.flush();
            } catch (IOException e) {
                errorExit("Fatal Error", "In onPause() and failed to flush output stream: " + e.getMessage() + ".");
            }
        }

        try
        {
            btSocket.close();
            conectado=0;
        } catch (IOException e2) {
            errorExit("Fatal Error", "In onPause() and failed to close socket." + e2.getMessage() + ".");
        }
    }

    private void checkBTState()
    {
        // Check for Bluetooth support and then check to make sure it is turned on
        // Emulator doesn't support Bluetooth and will return null
        if(btAdapter==null) {
            errorExit("Fatal Error", "Bluetooth not support");
        } else {
            if (btAdapter.isEnabled())
            {
                Log.d(TAG, "...Bluetooth ON...");
            } else {
                //Prompt user to turn on Bluetooth
                Intent enableBtIntent = new Intent(BluetoothAdapter.ACTION_REQUEST_ENABLE);
                startActivityForResult(enableBtIntent, 1);
            }
        }
    }

    private void errorExit(String title, String message)
    {
        Toast.makeText(getBaseContext(), title + " - " + message, Toast.LENGTH_LONG).show();
        finish();
    }

    private void sendData(byte[] bytes)
    {
        //byte[] msgBuffer = message.getBytes();

        //Log.d(TAG, "...Send data: " + message + "...");

        try {
            outStream.write(bytes);
        } catch (IOException e) {
            String msg = "In onResume() and an exception occurred during write: " + e.getMessage();
            if (address.equals("00:00:00:00:00:00"))
                msg = msg + ".\n\nUpdate your server address from 00:00:00:00:00:00 to the correct address on line 35 in the java code";
            msg = msg +  ".\n\nCheck that the SPP UUID: " + MY_UUID.toString() + " exists on server.\n\n";

            errorExit("Fatal Error", msg);
        }
    }

}
Vídeo demostración
Y como un vídeo vale más que mil palabras, aquí os dejo el vídeo demostración de este proyecto.


0 comentarios